|
|
SophiaFramework UNIVERSE 5.3 |
Window is the responder designed to place various controls or containers.
An application class can have multiple windows piled up and displayed at the same time.
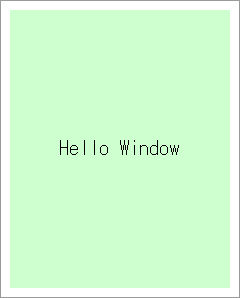
In this section, we will customize the code of the helloworld applet generated by the SophiaFramework AppWizard to display the string "Hello Window" in the window as the figure below.
First, let's define and implement the window(MyWindow) inheriting from SFZWindow as follows:
Figure 3.2. Drawing the string "Hello Window" in the center of MyWindow
MyWindow is specified as follows:
The following is the code to define the custom window(MyWindow) which inherits from SFZWindow.
Example 3.9. Define MyWindow
// define the MyWindow class
SFMTYPEDEFRESPONDER(MyWindow)  //  macro to generate the useful types
class MyWindow : public SFZWindow // inherit from SFZWindow
{
    SFMSEALRESPONDER(MyWindow)  //  macro to prohibit the developer from copying this instance

    // macro to specify the inheritance relation from SFYResponder to this class
    SFMRESPONDERINSTANTIATEFOUR(MyWindow, SFZWindow, SFYContainer, SFYWidget, SFYResponder)

public:

    // since small alphabet is reserved for 4-character literals,
    // define ('M', 'W', 'N', 'D') as 4-character literals for MyWindow with capital alphabet
    enum CodeEnum {
        CODE_TYPE = four_char_code('M', 'W', 'N', 'D')
    };

public:

    // generate the MyWindow instance managed by the smart pointer
    static MyWindowSmp NewInstance(SFCErrorPtr exception = null);

protected:

    explicit MyWindow(Void) static_throws;
    virtual ~MyWindow(Void);

    // drawing handler(override the HandleRenderRequest virtual function booted up first when the drawing event is received)
    virtual Void HandleRenderRequest(SFXGraphicsPtr graphics) const;

private:

    // key handler
    XANDLER_DECLARE_BOOLEVENT(OnKey)
};
![[Tip]](images/tip.png) |
SFMTYPEDEFRESPONDER macro |
|---|---|
SFMTYPEDEFRESPONDER is the macro to generate the useful user-defined types regarding the responder class specified as an argument. For instance, the smart pointer type of the responder given as an argument is defined by this macro. | |
|
SFMRESPONDERINSTANTIATE macro |
|---|---|
|
SFMRESPONDERINSTANTIATE is the macro to avoid a bug of RealView Compilation Tools for BREW 1.2 compiler. This macro is ignored in compilers other than RealView Compilation Tools for BREW 1.2. When the responder class is defined newly, you have to describe the inherihance relation from SFYResponder to newly defined class with SFMRESPONDERINSTANTIATEZERO, SFMRESPONDERINSTANTIATEONE, SFMRESPONDERINSTANTIATETWO, SFMRESPONDERINSTANTIATETHREE, SFMRESPONDERINSTANTIATEFOUR, SFMRESPONDERINSTANTIATEFIVE, SFMRESPONDERINSTANTIATESIX, SFMRESPONDERINSTANTIATESEVEN depending on the number of inheritance layers. For instance, think of MyWindow as above. MyWindow, SFZWindow, SFYContainer, and SFYWidget inherit from SFZWindow, SFYContainer, SFYWidget, and SFYWidget respectively. Since there is four layers from SFYResponder to MyWindow, use the SFMRESPONDERINSTANTIATEFOUR macro. If the number of inheritance layers from SFYResponder is three, use the SFMRESPONDERINSTANTIATETHREE macro. If five layers, use the SFMRESPONDERINSTANTIATEFIVE macro. This macro is provided with up to the SFMRESPONDERINSTANTIATESEVEN macro which is used in inheriting from seven layers. | |
![[Important]](images/important.png) |
Creating the responder: NewInstance function |
|---|---|
|
The responder instance accessed through the smart pointer(SFXResponderPointer) must be created not with the "new" operator but with the NewInstance function. The responder class which has responder instances needs to have the NewInstance function defined and implemented with the SFYResponder::Factory function. | |
![[Note]](images/note.png) |
Drawing the responder |
|---|---|
|
To draw the responder from the outside, register the drawing handler to draw itself, like the code of the helloworld application class in the previous section. To draw the responder by itself, override the HandleRenderRequest function booted up when the drawing event is received, and describe the drawing procedure. Cautions on the drawing handler are as follows:
| |
![[Caution]](images/caution.png) |
Responder type |
|---|---|
|
When the new responder class inheriting from SFYResponder is defined, you are recommended to set the resopnder type of the 4-character literal with the four_char_code macro. Since the 4-character literals consists of small alphabet are reserved by SophiaFramework UNIVERSE, the 4-character literal consisting of capital alphabet is recommended as the responder type of the user-defined responder class. | |
Let's declare the smart pointer of MyWindow defined above and the function to make the MyWindow instance as the member of the helloworld application class.
Example 3.10. Update the helloworld application class
// define the helloworld class
SFMTYPEDEFCLASS(helloworld)  //  macro to generate the useful types
class helloworld : public SFYApplication
{
    SFMSEALCOPY(helloworld)  //  macro to prohibit the developer from copying this instance

private:

    // *** added code segments are in bold

    MyWindowSmp _myWindow; // smart pointer of MyWindow

public:

    static SFCInvokerPtr Factory(Void);

private:

    explicit helloworld(Void) static_throws;
    virtual ~helloworld(Void);

    // make MyWindow
    SFCError Make(Void);

    XANDLER_DECLARE_VOIDRENDER(OnRenderRequest) // declare the drawing handler
    XANDLER_DECLARE_BOOLEVENT(OnKey)            // declare the key handler
};
|
Smart pointer |
|---|---|
|
Since the responder instance is accessed through the smart pointer, it is necessary to create it with the NewInstance function and process it as an instance of the "smart pointer" class whose name has "Smp" as a suffix. The type of the "smart pointer" class is defined in the SFMTYPEDEFRESPONDER macro before the class declaration. For instance, MyWindowSmp is defined in the SFMTYPEDEFRESPONDER(MyWindow) macro. | |
Let's implement the NewInstance function to create the MyWindow instance accessed through the smart pointer, the constructor, the destructor, the drawing handler, and the key handler of MyWindow.
Example 3.11. Implement MyWindow
// create the MyWindow instance
MyWindowSmp MyWindow::NewInstance(SFCErrorPtr exception)
{

   // create the MyWindow instance with Factory()
   // since Factory() returns the SFYResponderSmp type
   // downcast into the MyWindowSmp type with the static_pointer_cast operator
   return static_pointer_cast<MyWindow>(Factory(:: new MyWindow, exception));

}

// define the color scheme
// light green color for MyWindow's background
#define COLOR_MY_WINDOW_BACK        (SFXRGBColor(0xCC, 0xFF, 0xCC, 0x00))

// constructor
MyWindow::MyWindow(Void) static_throws
{
    if (static_try()) {

        // four_char_code('M', 'W', 'N', 'D') is set as the responder type
        SetType(CODE_TYPE);

        // register the key handler
        static_throw(RegisterHandler(
            SFXEventRange(SFEVT_KEY, SFEVT_KEY, SFP16_BEGIN, SFP16_END),
            XANDLER_INTERNAL(OnKey)
        ));

        // since MyWindow::HandleRenderRequest function will be called first when the drawing event is received
        // it is enough to describe the drawing processing of MyWindow in this function
        // it is unnecessary to define, implement, register the drawing handler newly into MyWindow

        // set the MyWindow's background color to light green
        SetBackgroundColor(COLOR_MY_WINDOW_BACK);
    }
}

// destructor
MyWindow::~MyWindow(Void)
{
}

// define the color scheme
// black color for string
#define COLOR_BLACK                 (SFXRGBColor(0x00, 0x00, 0x00, 0x00))

// drawing handler
Void MyWindow::HandleRenderRequest(SFXGraphicsPtr graphics) const
{
    // SFXGraphics instance for drawing is passed as the 1st argument(graphics)
    // left-top of MyWindow's local region is origin of the drawing region

    // MyWindow's local region is filled in light green,
    // which is set in the constructor with SFYWidget::SetBackgroundColor()

    // draw "Hello Window" string in black color at the center of MyWindow's local region
    graphics->DrawSingleText("Hello Window", GetLocalBound(), COLOR_BLACK);

    // there is no need to execute "graphics->Update();" when the GUI framework is used

    return;
}

// key handler (called when MyWindow is focused and some key is pressed)
// invoker is the responder of the SFYResponderPtr type which called this handler(in this case, MyWindow)
// event is key event of SFXEventConstRef type
XANDLER_IMPLEMENT_BOOLEVENT(MyWindow, OnKey, invoker, event)
{
    switch (event.GetP16()) {
        case AVK_CLR: // when the CLEAR key is pressed

            // close MyWindow
            invoker->Terminate();

            // return "true" since the key event is handled
            return true;

        case AVK_1: // when the "1" key is pressed

            // draw "1-key" in BREW Output Window
            TRACE("1-key");

            // return "true" since the key event is handled
            return true;
    }

    // return "false" since the key event is NOT handled
    return false;
}
|
static_pointer_cast operator |
|---|---|
Since the SFYResponder::Factory function returns the SFYResponderSmp type, you have to downcast it into the MyWindowSmp type with the static_pointer_cast operator. | |
|
SFYWidget::SetBackgroundColor function |
|---|---|
|
In the responder inheriting from SFYWidget, the background of the local region will be filled in the color[default: white] set with the SFYWidget::SetBackgroundColor function before the SFYWidget::HandleRenderRequest function is executed. In the constructor of MyWindow, the background color is set to light green with this function. | |
|
HandleRenderRequest function |
|---|---|
|
When the responder receives the drawing event, it will boot up the HandleRenderRequest function first. If the HandleRenderRequest function is overridden to implement the drawing processing, there is no need to register another drawing handler into the responder. At this time, you must take care that the content of the HandleRenderRequest function implemented in the parent class will be overridden completely. | |
|
When the drawing event is received |
|---|---|
In case of the helloworld applet, the drawing event will be sent by the renderer booted up by the SFYResponder::Render function, which will be called in the end of the event loop of the SFEVT_APP_START event. at the applet start. | |
|
Drawing the region of MyWindow |
|---|---|
MyWindow is drawn in the local region with the graphics object. | |
|
Key event which is not handled in MyWindow |
|---|---|
|
The key event which is not handled in MyWindow will be delegated to the root[SFZRoot] which the helloworld application class, parent resopnder of MyWindow, contains by default. If it is not handled by the root in the end, the renderer will not be booted up. | |
The procedure to make the responder is as follows:
Example 3.12. Make MyWindow
// make MyWindow
SFCError helloworld::Make(Void)
{
    SFCError error(SFERR_NO_ERROR);

    // create the MyWindow instance(called "_myWindow" in the below)
    if ((_myWindow = MyWindow::NewInstance(&error)) != null) {

        // obtain the root which the application class contains internally with SFYApplication::GetThis()
        // set the parent responder of _myWindow to the root
        error = _myWindow->SetParent(GetThis());

        if (error == SFERR_NO_ERROR) {

            // set the real region of _myWindow to the region obtained by deflating the device screen region by (10, 10)
            _myWindow->SetRealBound(GetLocalBound().Deflate(10, 10));

            // set the state of _myWindow to "visible" + "active" + "enable" + "focus" together
            _myWindow->SetState(true, true, true, true);

            // move _myWindow foremost
            _myWindow->ToFront();
        }
    }
    return error;
}
|
SFYApplication::GetThis function |
|---|---|
The SFYApplication::GetThis function returns the root[SFZRoot] which the application class contains by default. | |
|
SFYApplication.GetLocalBound function |
|---|---|
The SFYApplication::GetLocalBound function returns the local region (i.e., the rectangular region of the device screen) of the root[SFZRoot] which the application class contains by default. | |
|
SFXRectangle::Deflate function |
|---|---|
|
If the rectangle represented with SFXRectangle(x, y, w, h) is deflated by SFXSize(a, b), then it will be the rectangle of which the left-top is SFXGrid(x + a, y + b) and the size is SFXSize(w - 2 * a, h - 2 * b). For instance, if the local region(device screen) of the application class(i.e., root[SFZRoot]) returned by SFYApplication::GetLocalBound() is SFXRectangle(0, 0, 240, 320), the region after deflated by SFXSize(10, 10) will be SFXRectangle(10, 10, 220, 300). Reference: SFXRectangle::Deflate | |
|
Default virtual region and local region |
|---|---|
|
The virtual region of the responder will be physically the same with the real region if it is not defined. Since the virtual region is physically the same with the local region, the local region eqauls the real region at this time. The region of _myWindow is (0, 0, 220, 300) in the its local region coordinate system. * Drawing processing of the responder will be performed in the local region. | |
|
Real region |
|---|---|
|
Real region is the visible rectangular region of the responder. It is defined in the relative coordinate system of the local region of the parent responder. If the virtual region of the responder is not set, the local region equals the real region, and therefore all the local region is visible. If the virtual region is set, only the real region is visible. | |
|
Order relation amon the responders |
|---|---|
|
The responders are managed by the responder tree, and drawn on the device screen according to the order relation of the tree structure. In the order relation of the responder tree, the child responder is placed more foreground than the parent responder, and the older brother responder is placed more foreground than the younger brother responder. The child responder of the older brother responder is placed more foreground than the younger brother responder. By moving the responder foremost among the sibling responders, the child responders will be automatically moved more foreground than other sibling responders. To move the responder foremost among the sibling responders, call the SFYResponder::ToFront function. * By calling the SFYResponder::ToFront function of the container responder such as a window or a dialog inheriting from SFYContainer, the controls such as a button, a label, or a tab in the container responder will be moved together foremost. | |
|
SFYResponder::ToFront / SFYResponder::ToBack function |
|---|---|
The SFYResponder::ToFront or SFYResponder::ToBack function is used to move the responder such as a window or a dialog together with the child responders foremost or backmost among the sibling responders respectively. | |
|
Caution |
|---|---|
|
When the responder is appended on the responder tree, it will be placed backmost among the sibling responders. To display it on the device screen, it is necessary to move it foremost with the SFYResponder::ToFront function. | |
Let's update the key handler of the helloworld application class to display the window(MyWindow) when the "1" key is pressed in the initial screen.
Example 3.13. Update the key handler of the helloworld application class
// key handler
XANDLER_IMPLEMENT_BOOLEVENT(helloworld, OnKey, invoker, event)
{
    unused(invoker);

    // key handler
    switch (event.GetP16()) {
        case AVK_SELECT: // when the SELECT key is pressed
            Terminate(); // terminate the helloworld applet
            return true;

        // *** added code segments are in bold

        case AVK_1: // when the "1" key is pressed

            // make MyWindow
            if (Make() != SFERR_NO_ERROR) {
                return false;
            }

        // return "true" since the key event is handled
        return true;
    }

    // return "false" since the key event is NOT handled
    return false;
}
To close the responder such as a window or a dialog displayed on the device screen, call the SFYResponder::Terminate function.
Example 3.14. Key handler of MyWindow: terminate MyWindow when the CLEAR key is pressed
// key handler: terminate MyWindow when the CLEAR key is pressed
XANDLER_IMPLEMENT_BOOLEVENT(MyWindow, OnKey, invoker, event)
{
    switch (event.GetP16()) {
        case AVK_CLR: // when the CLEAR key is pressed

            // terminate MyWindow
            // invoker: pointer to MyWindow (SFYResponderPtr type)
            invoker->Terminate();

            // in this phase,  MyWindow still remains on the heap memory
            // MyWindow will be released from the heap memory when the reference count becomes 0

            // since MyWindow is referred to by _myWindow of the helloworld application class
            // MyWindow will be released from the heap memory when the helloworld applet terminates

            return true;

        case AVK_1:

    // ... (omitted) ...

}
|
SFYResponder::Terminate function |
|---|---|
|
When the responder is terminated with the SFYResponder::Terminate function, it will be cut off from the responder tree and its valid state flag will be set to "false". The terminated responder will be automatically released from the heap memory when its reference count becomes 0. This function will be automatically called when the reference count becomes 0. For almost all responders, there is no need call this function . In the temporary responder such as a menu or a dialog which needs to be closed immediately after the user operation, calling this function explicitly is necessary to terminate it on the spot. But it will remain on the heap memory if it is refered to by the smart pointer. To release it from the heap memory immediately, make its reference count 0 by calling the smart pointer's SFXResponderPointer::Release function or substituting another responder into the smart pointer. Reference: SFYResponder::Terminate | SFXResponderPointer::Release | Responder Tree | |
|
Tip |
|---|---|
The SFCApplication::Terminate function is only for finalizing the applet. | |
|
"delete" operator |
|---|---|
|
You MUST NOT execute the delete operator on the responder in the responder tree. If the responder is deleted from the heap memory with the delete operator, inconsistency may occur since it is assumed to exist in the responder tree. To close the responder, use the SFYResponder::Terminate function. | |
|
Note |
|---|---|
|
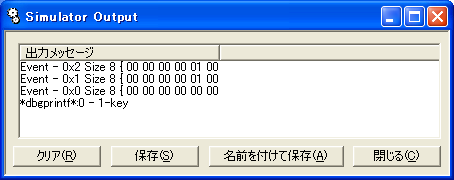
BREW Output Window can be displayed by clicking the following on BREW Simulator. [menu]->[display]->[Output Window]
| |
Reference: Window(Basic)
|
Copyright(c) 2002 - 2025 Sophia Cradle Incorporated All Rights Reserved. |
|